Case 1
- Introduction
- Causes of Defects
- Good Practices
- Standards
- Maintenance and Diagnostics
- Remedial
- Similar Cases
- References
Good Practices
Design
Rising dampness is caused by moisture ascending through capillaries in masonry and concrete walls. The smaller the diameter of the capillaries the higher the dampness will rise. Implement proper waterproofing
design detailing for reinforced concrete structures. To avoid rising dampness, use suitable DPM/DPC for the site ground conditions in accordance with SS 637 (formerly CP 82) or equivalent.
Construction
Provide adequate damp-proof course/membrane at a height of at least 150 mm above the surrounding finished floor level, to prevent upward movement of moisture through capillary action or rainwater bouncing off the ground. Provide adequate surface drainage and adequate coating, and/or hydrophobic materials, and/or chemical injection as moisture barrier in accordance with BS 8215, BS 6576 or equivalent.
Brick
Design
Design and plan well. Attention must be paid to waterproofing the brickwall. Important considerations to place on:
- Design recommendations
- wall types,
- workmanship characteristics,
- detailing, flashing,
- drips and weep holes
Material
- Selection of bricks should meet the requirements of relevant standards.
- All bricks should be accompanied by the manufacturer’s certificate.
Construction
- Workmanship characterized by the complete filling of all mortar joints intended to receive mortar is desirable, as is the need to keep all cavities clean and free of mortar droppings.
- Attention to both of these items is of primary importance in preventing moisture penetration to the interior of masonry.
- Protection
- Partially completed masonry walls exposed to rain and other elements during construction may become saturated with water and can require weeks, or even months (depending on climatic conditions), after the completion of the building for the masonry to dry. This prolonged saturation may cause many “slightly” soluble salts, as well as the highly soluble salts, to go into solution. Such conditions may also contribute to the contamination of the masonry with soluble salts from elsewhere in the construction (concrete, plaster, trim, etc.).
- During construction, all walls should be kept dry by covering with a strong, waterproof membrane at the end of each workday or shutdown period. These are used in conjunction with plastic sheets or water-repellent tarpaulin material and offer excellent protection for extended periods of time.
Quality control
Conduct water test to the external full height facing brick walls to test the watertightness of external wall construction [3].
Storage
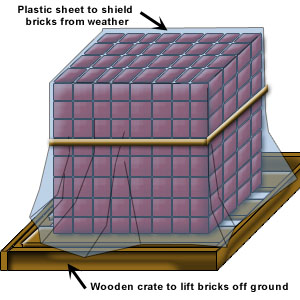
Masonry units should be stored off the ground to avoid contamination by dirt and ground water which may contain soluble salts.
Mortar
Design
| Basic composition | Cement: lime: sand with air-entrainment | Cement:sand with air entrainment | Cement:Lime:sand | ||
| Binders | Ordinary Portland cement or sulphate-resisting Portland cement | Masonry cement with high lime content (1:1:OPC:lime) | Masonry cement with other than high lime content | Ordinary Portland cement or sulphate-resisting Portland cement | |
| Designation | |||||
| (i)(ii)(iii)(iv) | 1: 1/2: 4/1/2 +Air1: 1: 5/1/2 +Air | 1: 31: 4/1/2 | 1: 2/1/2-3/1/21: 4-5!: 5/1/2-6/1/2 | 1: 3-4 + Air1: 5-6 + Air1: 7-8 + Air | 1: 0-1/4:31:1/2: 4-4/1/21:1: 5-61: 2: 8-9 |
Table 1: Mortar mixes and designations
Material
- Use prepacked mortar for consistency
- It should be noted that the principal contribution to lime leaching in mortars is the high alkali content of the portland cement. Cements high in alkaline content are more prone to produce efflorescence than cements of lower alkali content.
- Other ingredients for mortar, i.e., lime, sand and water, should also be selected with care, although their contribution to efflorescence may be less frequent.
- Mortar types and proportions should be selected on the bases of structural and exposure requirements for the particular project.
Construction
- Mechanical mixing of prepacked mortar is advisable. Mixing time should be approximately 10 minutes to achieve good workability.
- Fill all mortar joints solidly
- Clean all excess mortar from mortar joints.
Damp proof course
Design
DPC should be designed in conjunction with flashings and other waterproofing systems to ensure a continuous barrier.
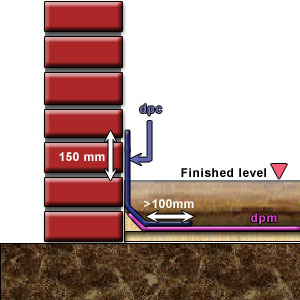
The DPC should be laid 150mm above the finished level and also placed vertically to overlap the DPM a minimum of 100mm (Figure 2a and b).
This is so that no moisture is allowed to pass between the wall and the floor.
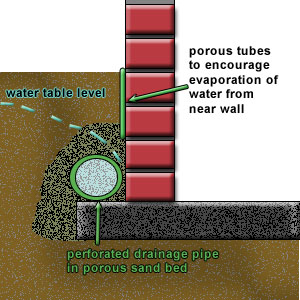
Site drainage or subsoil drainage can also be used to lower the groundwater level near the wall so that the amount of groundwater reaching the wall can be reduced [1] (Figure 3).
Construction
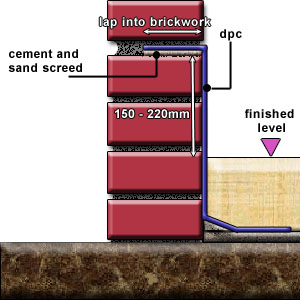
- Lay the damp proof course weighing 3.3 kg m2 to break joint on a layer of cement and sand mortar laid immediately at a level 150mm to 220mm above the ground level in brickwalls [2].
- Bed all DPCs on fresh mortar