Case 2
- Introduction
- Causes of Defects
- Good Practices
- Standards
- Maintenance and Diagnostics
- Remedial
- Similar Cases
- References
Good Practices
Joint
Design
[su_row][su_column size=”1/2″] [/su_column] [su_column size=”1/2″]
 [/su_column] [/su_row]
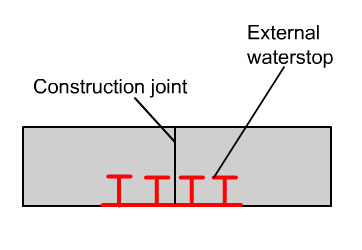
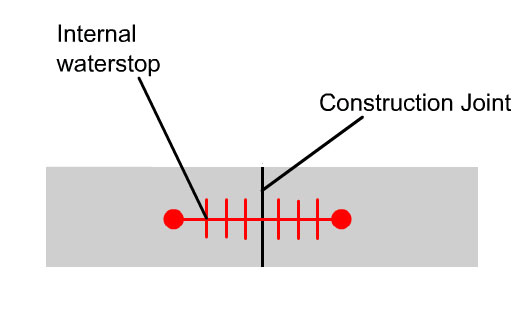
In order to enhance the water-tightness of the joint, a waterstop can be used for the joint (Figure 1a & b) [5-6].
The sealant width should not be too large or too narrow. Width that are too large may result in cohesive failure of the joints since the sealant might not be able to completely fill the joint whereas too narrow a joint prevents the sealant and the backer rod from being installed properly. Following guidelines can be used [5-6],
Width of sealant
A derivation for the minimum width for sealant joint is given by ASTM C719:1993 and BS 6093:1993 (Equ.htm). Where TRM: total relevant movement, MAF: movement accommodation factor.

Width-to-depth ratio relationship [6]
| Joint width (mm) | Depth of sealant joint (mm) |
| 0.64 – 1.27 | 0.64 – minimum* |
| 1.27 – 2.54 | Width/2 |
| Above 2.54 | 1.27 – maximum |
*Maximum depth must not exceed width
External Wall
Design
Suitable wall finishes such as plaster or water repellents other coatings should be provided to improve the water-tightness of the external wall [7-17]. E.g. The cement mortar should possess the desired characteristics of high water retentivity, high plasticity, good adhesion and should not shrink excessively during and after hardening [8]. Table 1 recommends some plaster mix proportions.
| Mix | Mix proportions by volume based on damp sand | ||||
| Cement : Lime : Sand 1) | Cement : Ready-mixed lime/sand 1) | Cement: sand 1) (using plasticizer) | Masonry cement: sand 1) | ||
| Ready-mixed lime:sand | Cement: ready-mixed material | ||||
| I | 1 : ¼ : 3 | 1:12 | 1 : ¼ : 3 | – | – |
| II | 1 : ½ : 4 to 4 ½ | 1:12 | 1 : ½ : 4 to 4 ½ | 1 : 3 to 4 | 1 : 2 ½ to 3 ½ |
| III | 1 : 1 : 5 to 6 | 1:12 | 1 : 1 : 5 to 6 | 1:5 to 6 | 1 : 4 to 5 |
| IV | 1 : 2 : 8 to 9 | 1:12 | 1 : 2 : 8 to 9 | 1:7 to 8 | 1 : 5 ½ to 6 ½ |
| V | 1 : 3 : 10 to 12 | 1:12 | 1 : 3 : 10 to 12 | – | – |
| 1) With fine or poorly graded sands, a lower volume of sand should be used.Note: In special circumstance, e.g. where soluble salts in the background are likely to cause problems, mixes based on sulphate-resisting Portland cement should be employed. | |||||
The following waterproofing coatings can also be used for brick wall which exposes to more severe weather condition or subjected to frequent impingement of rainwater from the roof:
- Plaster mixed with waterproofing admixtures
- Elastomeric paints
- Cementitious coating
- Water-repellent coating such as silane
Construction
Particular attention should be paid to ensure that the joints are properly grouted and to be free of voids. For joints between brick wall and reinforced concrete wall like this case, there should be bonding bars secured to or cast in the reinforcement concrete wall and be extended into the brick wall. The bonding bars are important in minimizing cracks along the joint.
Paint
Material Selection
Use of a paint system, which allows moisture to pass through the coating to reduce the moisture pressure is another alternative to minimize paint defects caused by moisture [1,4].
Construction
Prior to the application or re-application of paint system, surface condition should be checked. Surface condition for painting process should be as follows[1, 18-19]:
- For new plaster, the plaster surface should be allowed about 30 days for proper curing and the reduction of moisture content. Further, it will need to be primed. The type of primer used will depend upon the final decoration required. If you plan to use oil-based paint, an alkali-resisting primer should be used. For water-based paints, a diluted first coat can be used to prime.
- For old surface, the preparation required will depend upon the condition of the surface. If it is clean, dry, and sound it will require no special preparation. However, if the surface is powdery or there is other evidence of old distemper residue, it should be dusted off and sealed with a stabilizing solution.
- For the painted surfaces, the existing paintwork should be washed down first. This is necessary to remove traces of dirt and grease, which would otherwise cause failure of subsequent decoration.
- Light sanding with fine-grade, preferably part-worn, sandpaper would be able to remove ‘nibs’ and adherent dust particles, and to assist adhesion or provide a smooth level surface (Figure 2). Remove all loose and foreign particles by manual cleaning with scraping for painted surfaces (Figure 3).
- Check the moisture of the substrate (Figure 4). The moisture content should not be more than 6%.
Quality Control
Quality assurance can be carried out as below:
| STAGES OF WORK | CHECK | CRITERIA |
| Recognition of environmental conditions | Temperature o f site | Ambient temperature > 5 °C or refer to manufacturer’s recommendations |
| Substrate temperature | Surface temperature of substrate < 60 °C or refer to manufacturer’s recommendationsSurface temperature of substrate > 3 °C + ambient temperature or refer to manufacturer’s recommendations | |
| Relative humidity | Refer to manufacturer’s recommendations | |
| Checking of Surface Preparation | Method of surface preparation | Comply to approved submission |
| Prepared surface | Free from foreign and unstable matters such as dust, dirt, rust, cement, spatter, salt, grease and oil | |
| Mixing of paint | Mixing ratio | Comply to specification
Sufficient stirring until uniformity |
| Painting control | Surface just before painting | Painting should start preferably within 24 hours after preparation |
| Protection to elements not to be coated | Mask or cover those elements not to be coated | |
| Process of application | Comply to approved submission | |
| Intervals between coats | Refer to manufacturer’s recommendations | |
| Wet film thickness | Refer to manufacturer’s recommendations |
Source: BCA (2001b) Good Industry Practice-Painting